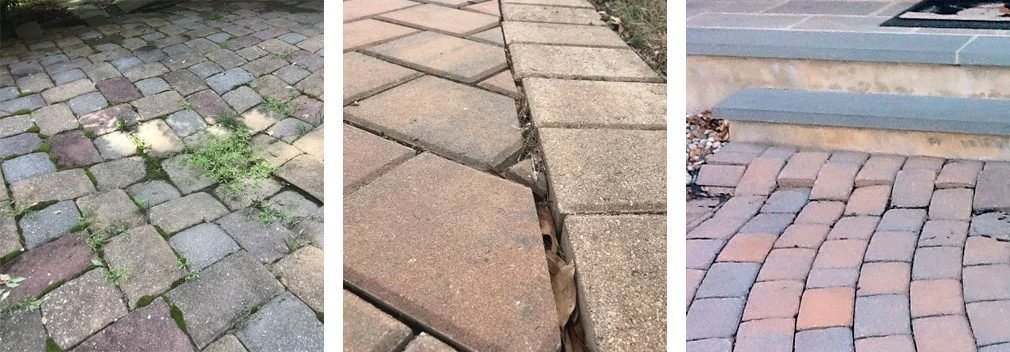
Common Paver Installation Failures and How to Avoid Them
Installing pavers is a fantastic way to enhance outdoor spaces, providing both functionality and aesthetic appeal. Whether it's a driveway, patio, walkway, or garden path, pavers can transform any area into a beautiful and durable surface. However, as with any construction project, mistakes can happen, and poor installation can lead to significant issues down the road. This article will explore some of the most common paver install failures and offer tips on how to avoid them. Proper preparation and knowledge are key to ensuring that your paver project stands the test of time.
Improper Base Preparation
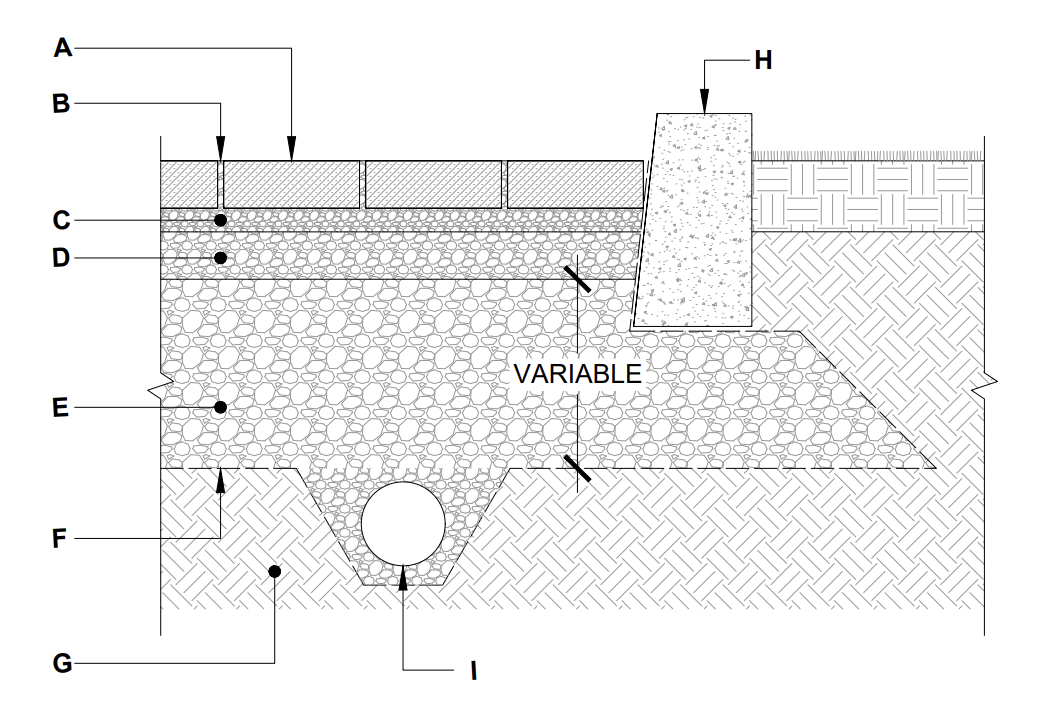
One of the most common causes of paver installation failure is insufficient or improper base preparation. The base is critical because it provides the foundation and support for the pavers. Without a solid base, the pavers can shift, crack, or even sink over time.
What Goes Wrong:
- Using the wrong type of base material.
- Failing to compact the base properly.
- Skipping steps like adding a sub-base or leveling the ground correctly.
How to Avoid It:

- Always use a clean stone as the foundation, ensuring proper drainage and stability.
- Compact the base thoroughly using a mechanical compactor to ensure it’s stable and level.
- Take the time to check the levelness of the base before proceeding with the paver installation. This ensures that the pavers will settle evenly and prevents them from shifting.
Incorrect Edge Restraints
Edge restraints are essential to keeping pavers securely in place, especially along the perimeter of your project. Without proper edge restraints, pavers are likely to shift or even come loose over time.
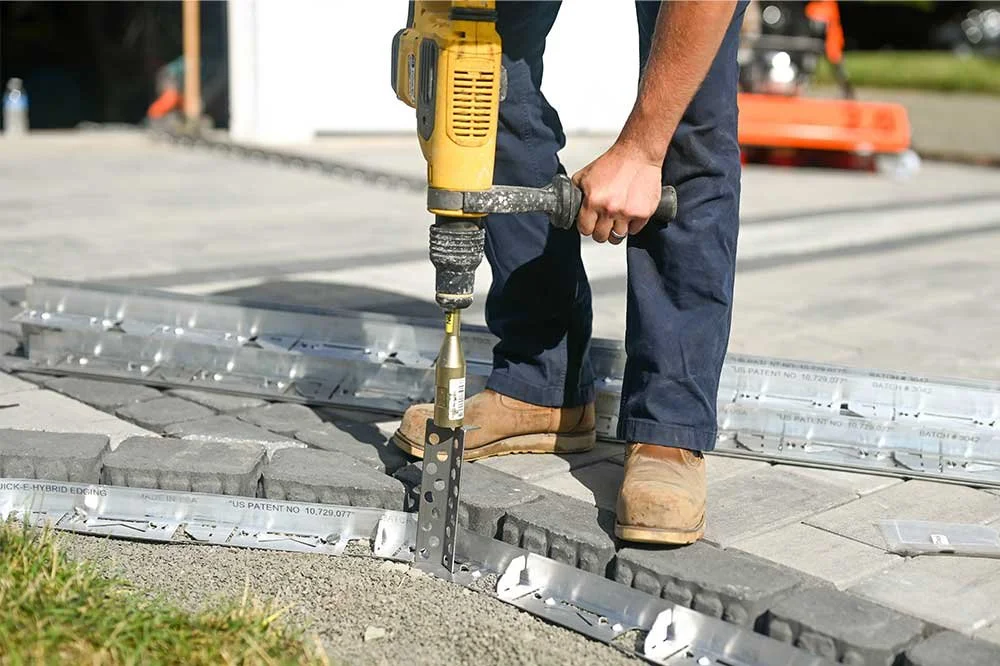
PaveTool Quick-E-Hybrid HD Edging
What Goes Wrong:
- Not installing edge restraints at all.
- Using the wrong type of edge restraint for the project.
- Installing edge restraints too high or too low, causing the pavers to misalign.
How to Avoid It:
- Always install plastic, metal, or concrete edge restraints to secure the edges of your pavers.
- Ensure that the edge restraints are level with the surface of the pavers, keeping them firmly in place without being too visible.
- Use stakes or spikes to secure the restraints in place, ensuring they stay put over time.
Inadequate Compaction of Pavers
Once your pavers are laid down, they must be properly compacted into place to ensure they lock together and form a solid surface. Without this step, the pavers may shift over time, causing an uneven or unstable surface.
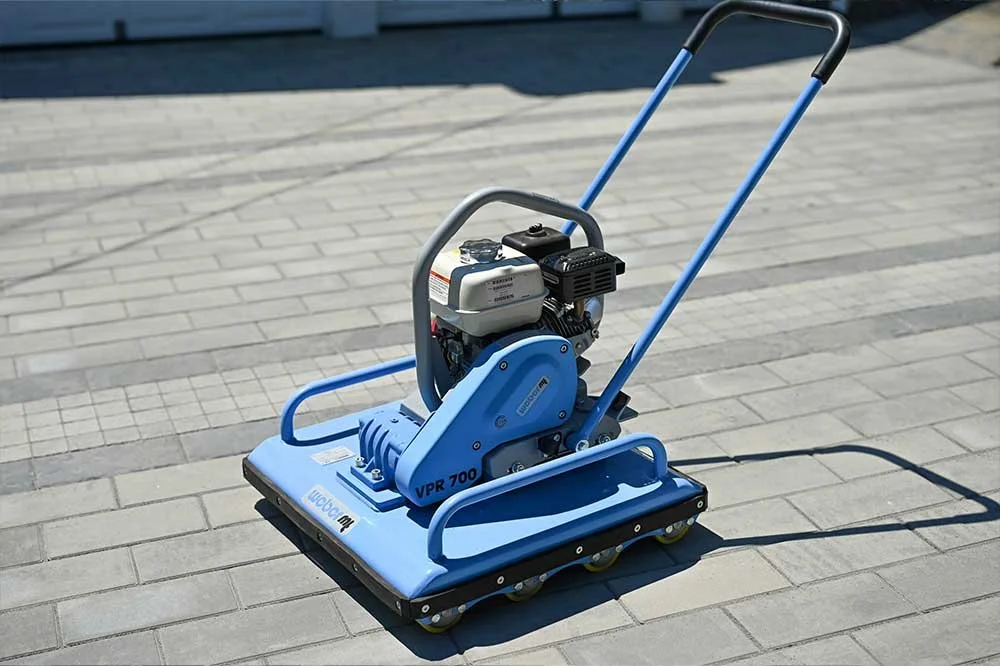
Weber VPR 700 from PaveTool
What Goes Wrong:
- Not compacting the pavers enough or at all.
- Using a mechanical compactor that is too heavy or too light for the pavers.
- Failing to use a protective mat when compacting to prevent damage to the pavers.
How to Avoid It:
- Use a plate compactor to gently compact the pavers into place. Make sure the compactor is not too heavy, as this can damage the pavers.
- Add a layer of sand between the pavers and compact the surface multiple times to help them settle evenly.
- Always use a protective mat under the compactor to avoid damaging the edges or surface of the pavers.
Improper Joint Sanding
Joint sand is used to fill the gaps between pavers, preventing them from shifting and allowing water to drain through. When this step is done incorrectly, the pavers can become loose or uneven.
What Goes Wrong:
- Using the wrong type of sand (fine sand instead of coarse sand).
- Failing to properly sweep the sand into the joints, leaving gaps.
- Not compacting the sand correctly after it’s applied.
How to Avoid It:
- Always use coarse sand (preferably polymeric sand) to fill the joints between pavers. Polymeric sand helps lock the pavers in place and prevents weed growth.
- Sweep the sand thoroughly into the joints, ensuring they are completely filled.
- Once the sand is applied, compact the surface again to set the sand and ensure a secure fit between the pavers.


Poor Drainage
Water pooling on paver surfaces or beneath them is a common issue caused by poor drainage. Without proper drainage, your pavers could settle unevenly, crack, or shift over time.
What Goes Wrong:
- Installing pavers without proper drainage channels.
- Having an improperly sloped surface that directs water toward the pavers.
- Failing to leave enough space for water to drain underneath the pavers.
How to Avoid It:
- Always ensure that the base is graded properly to allow water to flow off and away from the surface. A slight slope (about 1-2% grade) is essential for directing water away from the paver area,
- Install drainage pipes where necessary, especially for areas with heavy rainfall or low-lying ground.
- Leave enough room for water to drain through the joints and base. A permeable paver system can also help enhance drainage and prevent water pooling.
Not Allowing for Expansion and Contraction
Outdoor surfaces are constantly exposed to changing weather conditions, which can cause materials to expand and contract. If pavers aren’t installed with this in mind, they could buckle or crack under pressure.
What Goes Wrong:
- Installing pavers too tightly together, leaving no room for expansion.
- Failing to account for temperature fluctuations or shifting ground.
How to Avoid It:
- Allow for small gaps between the pavers to accommodate expansion and contraction if they are not manufactured with lugs.
- Use a flexible material like sand or polymeric sand that can adjust to small shifts in temperature or ground movement.
- Make sure the paver layout accounts for potential shifts, especially in areas with extreme temperature changes.


Choosing Low-Quality Pavers
While it may be tempting to save money by choosing cheaper, low-quality pavers, this can lead to problems down the line. Poor-quality pavers can crack, fade, or degrade over time.
What Goes Wrong:
- Choosing pavers that aren’t durable enough for the intended use (e.g., using thin pavers for a driveway).
- Low-quality pavers that deteriorate quickly under the sun or during freezing temperatures.
How to Avoid It:
- Invest in high-quality concrete or natural stone pavers that are suitable for your climate and intended use.
- Consider the thickness and strength of the pavers, especially for high-traffic areas like driveways.
- Look for pavers with a high SRI (Solar Reflective Index) rating for better heat resistance in hot climates.
Conclusion: Preventing Paver Install Failures
Paver installation is a skill that requires careful planning, the right materials, and a solid understanding of construction techniques. By avoiding these common installation mistakes and following best practices, you can ensure that your paver surfaces will last for many years without issues.
Taking the time to prepare the base properly, using quality materials, and ensuring correct drainage and alignment are essential steps in a successful paver project. Whether you're installing a small patio or a large driveway, remember that the foundation of a long-lasting, beautiful outdoor space lies in the details of your installation.
